Have you ever set a personal goal and immediately realized your life is set up to operate in complete resistance to that goal?
I set into motion a plan to pay off some lingering debt. I’m tired of paying the same monthly bills and seeing the balances barely decrease. Let’s pay it off. I’m ready.
Back to having my life set up against my goals…if you decide to do everything possible to pay off debt and still subscribe to stereo magazines showing you fancy new gear that makes you want to spend money, you’re doing it wrong.
I have two options here: 1) cancel my subscription or 2) understand most of the gear presented is way out of my price range anyways, with or without debt, and continue to read for the educational aspects of it and maybe have a blog where you can write about what you’d like to hear even when it’s not affordable, ahem.
That final point brings me to the Micromega M-One amplifier which I first discovered in the most recent issue of Sound & Vision Magazine.
The first thing I noticed was a slim orange box that looked more like a weight scale rather an integrated amplifier. I showed the magazine to my wife and said, “Weird, this thing is actually an amplifier!”.
Image Courtesy of https://www.stereophile.com/content/micromega-m-one-all-one-streameramp
Receivers are historically nothing but large black boxes (at least these days) that weigh a ton and sit rather unattractively in an entertainment center. Every day our partners stare at that black box hoping for its demise. Unless you bring home a pretty vintage Pioneer, Sansui or Marantz, the black box integrated amps are asking to be kicked out of the house from day one.
Has Micromega solved this issue by offering a colorful slim design that looks like anything but an integrated amplifier? Perhaps.
More importantly, how does it sound?
With a price tag of $7,499 (and my debt pay off plan mentioned above), I will not be personally listening to a M-150 anytime soon. After all, I titled this post Need To Hear This, right?
I suggest jumping over to Sound & Vision’s great review to read more about how the amplifier sounds. All I can say is after reading their opinion, I definitely wanted to hear one myself. Maybe someday I will!
If interested, here are specs for the unit:
Class AB Stereo Amplifier
DAC PCM 32/768 and DSD256
DLNA
Ethernet
Bluetooth SBC and apt-X
S/PDIF and I2S digital audio inputs
Asynchronous USB input
Acoustic calibration by microphone M.A.R.S
Power: 2x150W (8 Ohms)
Signal-to-noise ratio: 100 dB (RCA), 103 dB (XLR) and >75 dB (phono)
Channel separation: 96 dB at 1 kHz and 80 dB at 10 kHz
Sensitivity phono input: 12 mV and 1.2 MV (MM and MC)
Line Input Sensitivity: 1.4 Vrms (RCA) and 1.7 Vrms (XLR)
Low Low Output Filter: 400 Hz
Inputs: 1x USB type B, 2x USB Type A (service), 2x HDMI I2S, 1x optical S/PDIF Toslink, 1x S/PDIF coaxial RCA, 1x trigger, 1x XLR, 1x RCA, 1x MM/MC phono, 1x microphone,
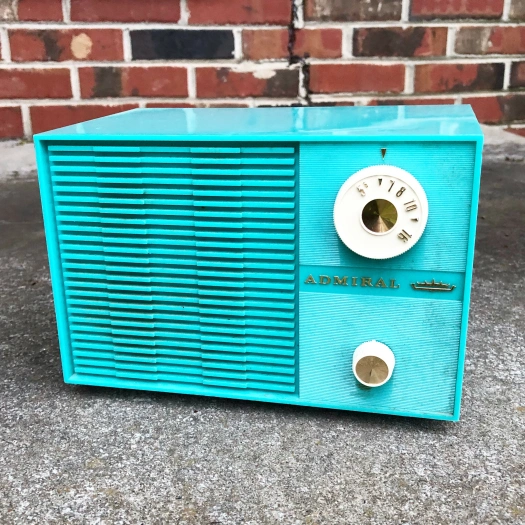
This Admiral Y-2998 radio dates back to 1961 and contains four tubes mounted on a circuit board. I purchased the radio knowing it was not operating correctly with the hope of bringing her back to life.
The radio arrived with one of the tubes rolling around inside. I removed the back of the radio and noticed all four tubes were the original Admiral brand and therefore were older than 1961.
I first tested the tubes and found the 50C5 output and 35W4 rectifier tubes were both dead. I also knew I would need to replace the filter capacitor (the tall brown cardboard can) with new capacitors.
Most radios I work on have point to point wiring underneath the chassis of the radio. This Admiral radio is one of the early models to incorporate tubes wired directly to a circuit board which is mounted sideways inside the radio cabinet.
I inserted the replacement tubes and slowly brought the voltage up on the radio with my variac machine. At just around 60 volts, a .02 capacitor (C10 on the schematic) caught fire and exploded. That was a first.
Replacing the filter capacitor (the tall brown cardboard tube in the photo below) was a challenge in terms of real estate. I needed to fit three new capacitors in the same space the tall paper can sat before. Fortunately, the new capacitors were small enough to solder the negative leads together and still fit on the circuit board.
I tested the radio again with the new capacitors and tubes and was able to tune in our strongest AM station, WSM. I had trouble tuning in the other stations and decided to replace the 12AU6 and 12AV6 tubes. After installing those tubes, the radio is working properly and off to a new home.
A few weeks ago I received an estate sale notification containing a few blurry photos of all the items for sale. I could spot a receiver in the pile but couldn’t tell what model it was. I assumed it was a Pioneer and that it would sell quickly as vintage gear usually sells on the first day. The only plus was the sale was over 40 miles outside of the city, in a very rural area, so maybe it would still be there Saturday.
I made the long drive on Saturday, leaving later than planned, telling myself the entire way it was a waste of time and the receiver would have been sold.
I pulled up to the house and noticed from the long driveway that they still had a lot of items for sale. As I walked up the driveway, I saw the receiver immediately only to discover it wasn’t a Pioneer but a Marantz! And even better, they had it priced fairly at $115. I plugged her in and she powered on properly so I offered $100 and they accepted. I was excited.
Upon first testing of the receiver at home, I knew immediately it needed a thorough cleaning and a few lights were burned out. As I adjusted the volume knob, the music would completely drop out and make awful scratchy noises.
Below is a before and after video showing how she looked and sounded when I first brought her home and after I cleaned her up and installed new lights.
These issues are common with old receivers and people often ask me how to clean up an old receiver. I’ve spent the last two to three years researching these methods through YouTube videos and audio forums and decided to put together this step by step guide for beginners.
Please note – I am still teaching myself how to repair vintage audio gear and would not consider myself an expert. This guide is not meant to repair all vintage audio gear, only point out how to handle cleaning and replacing lights.
If you are a beginner and want to follow this guide, please take your time and go slow. There are some steps that I will not include because they require soldering knowledge. But everything else just requires a screwdriver, some Deoxit, new lights, (a lot of) patience and a steady hand.
Let’s begin.
FIRST THINGS FIRST: UNPLUG THE UNIT!!!
These receivers pack enough of an electrical punch to cause serious injury so please unplug the unit before following any of the steps below. We can’t be held responsible for any damage to your equipment or more importantly yourself so please unplug the unit and if any of the steps below feel dangerous to you, please have a professional handle instead.
Let’s replace those lights!
With the unit unplugged, we need to remove the top of the unit which is easily handled by unscrewing four screws on each side of the unit. In the photo above I have already removed two from the left side.
Above is just an overhead view of the unit. This is what you will see once you have removed the top.
The lights for the dial face are underneath that long silver piece in the top photo. I’ve circled the two screws you need to remove in order to access the lights. Please note, these units are almost 40 years old and some of the plastic pieces crack easily. You can see in the bottom left photo that the plastic is cracking. When you remove and return the screws, go easy so those pieces do not break further.
With those screws removed you can slide the lights out by gently pulling it away from the front of the unit. In the photo above I’ve already replaced the lights with LED bulbs. What you will find are lights that look like fuses as shown in the bottom left photo below. Simply dislodge the old light and replace it with the new ones. Be careful, the old fuse lights can often break with too much force. I usually pry one side loose with a screwdriver and pop out of the socket.
Once the new lights are installed, the dial face should light up nice and bright like the below photo. Please note: if the dial pointer on your unit is burned out and you are a beginner without soldering skills, find someone else with the proper experience to handle replacing it for you. A hot soldering iron around the dial string could result in serious damage you want to avoid. I’m not including instructions on how to replace the dial pointer since this is a beginner’s guide.
Next, we need to replace the tuning meter light below. This photo is after I installed the new light.
The two screws below need to be removed but before you do, please read below…
CAUTION: THE DIAL STRING IS ATTACHED!
With the screws removed you run the risk of the dial string coming loose. (The dial string is what allows you to tune in radio stations and if it is cut, you will loose that function on your receiver.) I was able to keep pressure on the string so it didn’t come off the plastic guide. It might not have mattered but I was worried the string would fall off the other guides leaving me have to restring the dial which would not be fun. Just take it VERY SLOW here. There is one light bulb inside the plastic piece which can be gingerly swapped out.
Once the tuning bulb is replaced, you are finished and can put the top of the unit back together.
Lastly…where do you buy lights? I use www.dgwojo.com where I email David the name of the unit and model number and he provides me with the options needed.
Cleaning Pots. Eliminate Scratchy Sounds For Good!
To eliminate scratchy sounds on your receiver, you need to clean all of the potentiometers or “pots”. These can vary from knobs you turn to buttons you push or slide.
The Marantz 2215b has the following pots and switches to clean:
Four pots to clean: Volume, Selector, Treble, Bass
Four push button selectors to clean: FM Muting, Hi Filter, Tape Monitor and Loudness
One slider to clean: Balance (Left to Right)
Below are instructions on how to access and properly clean.
First, with the power still unplugged from the receiver, you need to remove all screws underneath the unit. You might want to keep a bowl or container close by to keep the screws safe. These screws have a tendency to run away. I count 11 screws in the above photo that need to be removed.
The secret to clean pots is in the sauce and you will want to have a can of Deoxit on hand to spray into the pots to clean. Deoxit can be found at your local Guitar Center or simply via Amazon.
I do not recommend using any other cleaner besides Deoxit. Please do not take any liberties here and try something different. Deoxit is the only product to use.
Where do I spray? In the above photo you will see where to spray behind the volume pot. You do not have to spray a lot. A little squirt goes a long way with Deoxit. After you spray the Deoxit in, simply turn the volume knob on the front of the unit back and forth, back and forth many times to work the Deoxit in. I usually go back and forth about 100 times which sounds like a lot but since I have the unit open I may as well get her as clean as possible.
Next you will want to spray the Deoxit into the tone control pots which I’ve circled in the photo above. They are tucked away but reachable with the straw provided with the Deoxit can. Just find the same openings you sprayed into on the volume pot, give a little squirt in each and beginning turning the knobs back and forth.
To clean the push button switches on the front of the unit, you will need to locate the circled areas in the above photos. I slightly push in the button and the little metal bar moves which is where I give a little Deoxit squirt. See photo below. Once the Deoxit is applied, I simply the push the button in and out around 100 times to make sure it cleans properly.
The most important push button switch to clean is the Tape Monitor one. A dirty Tape Monitor switch can cause all sorts of problems, including a loss of sound. Just remember to not keep the switch activated when you eventually power the unit back on or you will not have sound.
Now we want to clean the Balance sliding bar on the front of the unit. If you look closely, you will see a long skinny box with a couple of square shaped openings. See above and below photos. I spray a little squirt of Deoxit into just one of the openings and then slide the balance switch back and forth on the front of the unit.
Congratulations, you have cleaned all of the pots and switches needed.
WARNING: DO NOT POWER THE UNIT UP TO TEST FOR 24 HOURS.
I usually give the Deoxit PLENTY of time to dry before I power the unit back up to test. Even though Deoxit dries quickly, it’s still liquid based and we know how electricity and liquids mix. So, pat yourself on the back for all the work so far and just be patient, knowing you can power her up the next day.
One last piece of advice, before you plug the unit back in and power her up to test everything, go ahead and turn the volume knob all the way down and make sure your balance knob is correctly centered. Just give the unit a quick eyeball to make sure you will not blow yourself (or your speakers) away when you turn the unit back on.
If everything was cleaned properly, the unit should light up nice and bright from the new lights and the scratchy sounds should be eliminated. If so, turn the unit back off, unplug again and reinstall the bottom and top covers.
If this doesn’t fix the problem, take the unit to a professional for repair. These instructions are meant for a beginner to clean the unit, not attempt a professional repair.
In the video I posted above, all that was needed were clean pots and new lights to get the unit playing properly again. These vintage units can still need a lot of adjustments or to be recapped for optimum use, but for now at least this will get it playing. Any further maintenance or repair should be taken to a professional.
If you enjoyed this post, please consider subscribing to our newsletter below. First time subscribers receive 15% off in our Etsy store.
We design shirts for fans of all things analog – visit the store and order yours today.
All I wanted was a Marantz 2270 receiver but prices were escalating between $750-$1,000 for used units and that was just too far out of my budget.
I’d been researching vintage receivers for over a year, having decided I wanted to completely rebuild my stereo system from the ground up with all vintage gear. I have owned several stereo systems in my life but never with any vintage pieces included. All my research led me to Marantz, specifically the 2270.
A few years ago, while visiting family in Alabama during the Christmas holiday break, I went hunting for Marantz receivers on craigslist. I found someone in Manchester, TN, selling a Marantz and a couple other receivers for $600. I immediately contacted him and we went back and forth a few times before finally he told me if I wanted these I could have them but he had another buyer behind me bugging him. The next buyer didn’t want all three so in order for me to do the deal I had to purchase all three at $600. I jumped on it.
I had to meet to him very early on a Monday morning at a Cracker Barrel in Manchester, TN, which is a 45 minute drive in the opposite direction of my office. The man was very nice, explaining his elderly father was a hi-fi nut and he was cleaning out his collection.
The receivers included in the purchase are pictured above, a very clean Marantz 2270, a Sansui 2000 and a Pioneer SX-450. He told me the Pioneer was not working properly but the Sansui 2000 was still in the original box and even included the receipt from where his dad had purchased the receiver brand new in the 1970’s. The one thing I’ll never forget was picking up the Marantz receiver and placing it in my car. The receiver weighs almost 40 pounds and I had never picked up a piece of stereo equipment that heavy before.
I finally had my Marantz 2270 and it sounded great. I was so nervous hooking it up, worried it wouldn’t work properly after paying someone $600. Thankfully it did and I’ve used it as my every day receiver since. As for the $600 price tag, I sold the Sansui and Pioneer receivers for around $200 so really my Marantz 2270 only cost me $400. Of course, once I had the Marantz in place, I then had to upgrade all of my other stereo components, a story for another day, especially how I came to own my Pioneer HPM-100 speakers.
This one purchase started my love affair for vintage audio gear and I’ve been buying and reselling ever since.
This website is our homage to great vintage analog gear of all kinds: receivers, radios, turntables, film cameras, speakers and more.
Sign up on our mailing list to receive 15% off your first purchase in our Etsy store.